Fleet Management with Azure IoT Hub and SIA Connect's Shadow API
Learn how to connect SIA Connect to Azure IoT Hub and manage it through the Shadow API via Azure IoT Hub
SIA Connect can be managed remotely by utilizing our internal REST API through the Shadow API (Proxy API to SIA). The Shadow API is a secure connection to the solution where REST API's are wrapped into secure MQTT messages. This makes it a suitable solution for scaling up your Industrial IoT application and fleet.
This makes it possible to fleet manage all the SIA Connect edges deployed in the field. In this article we will cover how to setup Azure IoT Hub as the proxy for the Shadow API which enables Cloud-to-device messages to manage the solution.
The following steps will be covered on how to use the Shadow API through Azure IoT Hub:
- Adding an Azure IoT Hub instance and enabling as Shadow API
- Creating a Shadow API request
- Example to read from a Shadow API endpoint
- Example how to import a complete configuration using the Shadow API
Automatic provisioning of the Shadow API through Azure IoT Hub Connector is currently only available using DPS and certificates. For using SAS token / Connection string for authentication you will need to generate a SAS token your-self and add this as password in the Shadow API
Using Azure Device Provisioning Service (DPS)
Utilizing the Azure Device Provisioning Service (DPS) for provisioning the device and the Shadow API is the most automated approach and scaleable. The DPS will automatically assign the device to an IoT Hub while SIA Connect automatically fetches the configuration and adds this as the Shadow API configuration making it very automated and scalable.
Read this article Get started with Azure Device Provisioning Service in IIoT to deploy the Azure DPS.
Enabling Shadow API in Azure IoT Hub instance
The first thing we need to do is to add an Azure IoT Hub instance to the solution. Do this by following the steps in Add Instances with reference to Azure - Instance & item setup for the parameterization. For more specific Azure DPS instructions check out Get started with Azure Device Provisioning Service in IIoT which will guide you through the different parameters and where to find them in Azure.
Remember to set the Shadow API parameter in the Azure IoT Hub instance
It is very important you remember to set the Shadow API parameter to Setup Shadow API with Provisioned data under the instance. Please not that no Cloud-to-device or Device-to-cloud items are added as they are normally done in the Azure IoT Hub Connector.
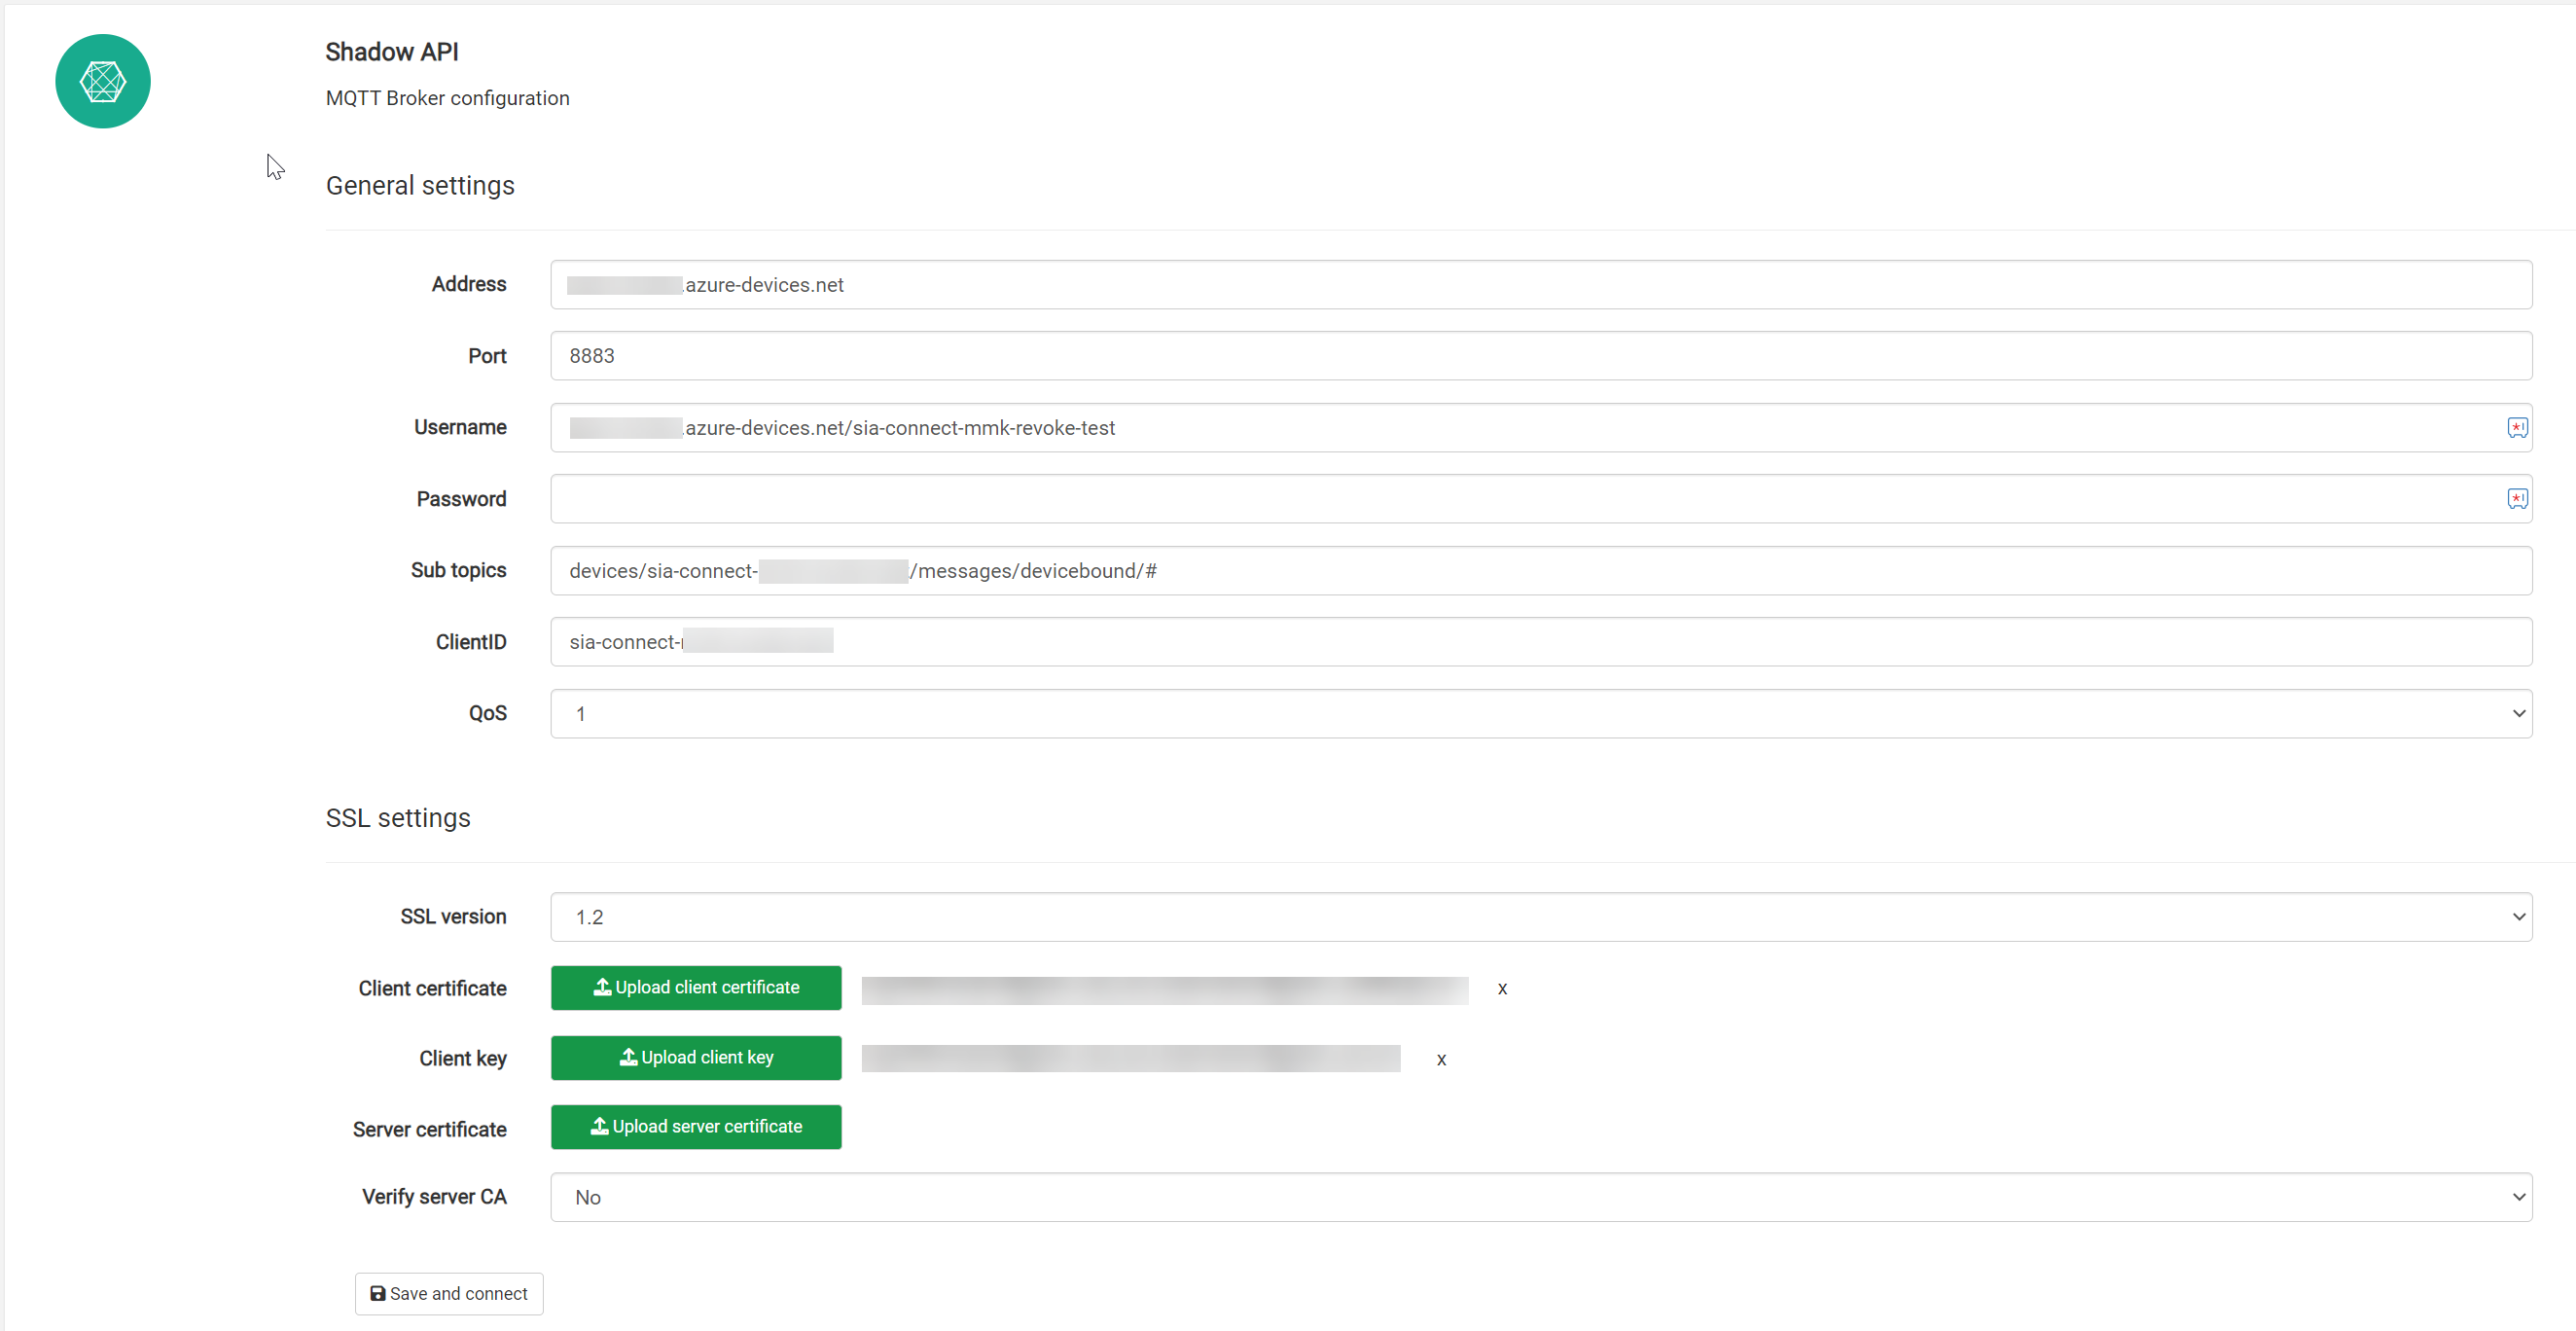
Shadow API settings automatically added
After successful connection to the Azure DPS you can see the parameters added to the Shadow API under the Tools page looking something like:

Sending API commands through Azure IoT Hub
Now SIA Connect has its Shadow API connected to an Azure IoT Hub through the Azure DPS you are able to transmit API commands and manage it through Cloud-to-Device messages. The format would need to match the one defined for the Shadow API.
API request in Cloud-to-Device & API response in Device-to-Cloud messages
All API requests are being sent through the Cloud-to-Device messages while the responses from the API is received in the Device-to-Cloud messages.
The easiest way to validate the API commands and Shadow API is by opening the Azure IoT Explorer to monitor the Telemetry messages and either using the Azure portal or Azure IoT explorer for sending the API requests through the Cloud-to-Device messages.
Creating API request
Let's craft an example message to request all the available information on SIA Connect. We do this by calling the /api/init endpoint
{
   "uid": "1234", (optional)
   "url": "/api/init",
   "sia_uuid": ["broadcast"], (optional)
   "method": "GET",
   "payload": "", (optional)
   "headers": {"Authorization": "Basic c2lhOmNvbm5lY3Q="},
   "status": "" (optional)
}
The authentication header can either be the supported basic authentication (Basic base64(username:password)) or you can implement the Bearer token. To simplify this example we use the Basic authentication.
Click here for our full API reference
Sending the API request
In the Azure portal or in Azure IoT Explorer desktop app locate the device in the IoT Hub which SIA Connects Shadow API has been provisioned as. Go to cloud to device messages and transmit the message crafted in previous step.
In the below example we will call the /api/setup/uuid which will load the UUID of the SIA Connect solution without requiring login
{
   "url": "/api/setup/uuid",
   "method": "GET"
}
and /api/init to load the complete configuration of the solution which requires a basic or bearer token authentication.
{
   "url": "/api/init",
   "method": "GET",
   "headers": {"Authorization": "Basic c2lhOmNvbm5lY3Q="}
}
The above messages are going to be sent through a cloud-to-device message from Azure IoT Hub to SIA Connect.
Cloud-to-device message
A cloud-to-device message (Azure IoT Hub → SIA Connect) can be sent using the Azure Portal, Azure IoT portal, MQTT or using a Azure SDK for your preferred developer tools
Response payload is HTML URL encoded
The response received from the Shadow API is HTML URL encoded in order to be able to contains special charachters into the MQTT payload.
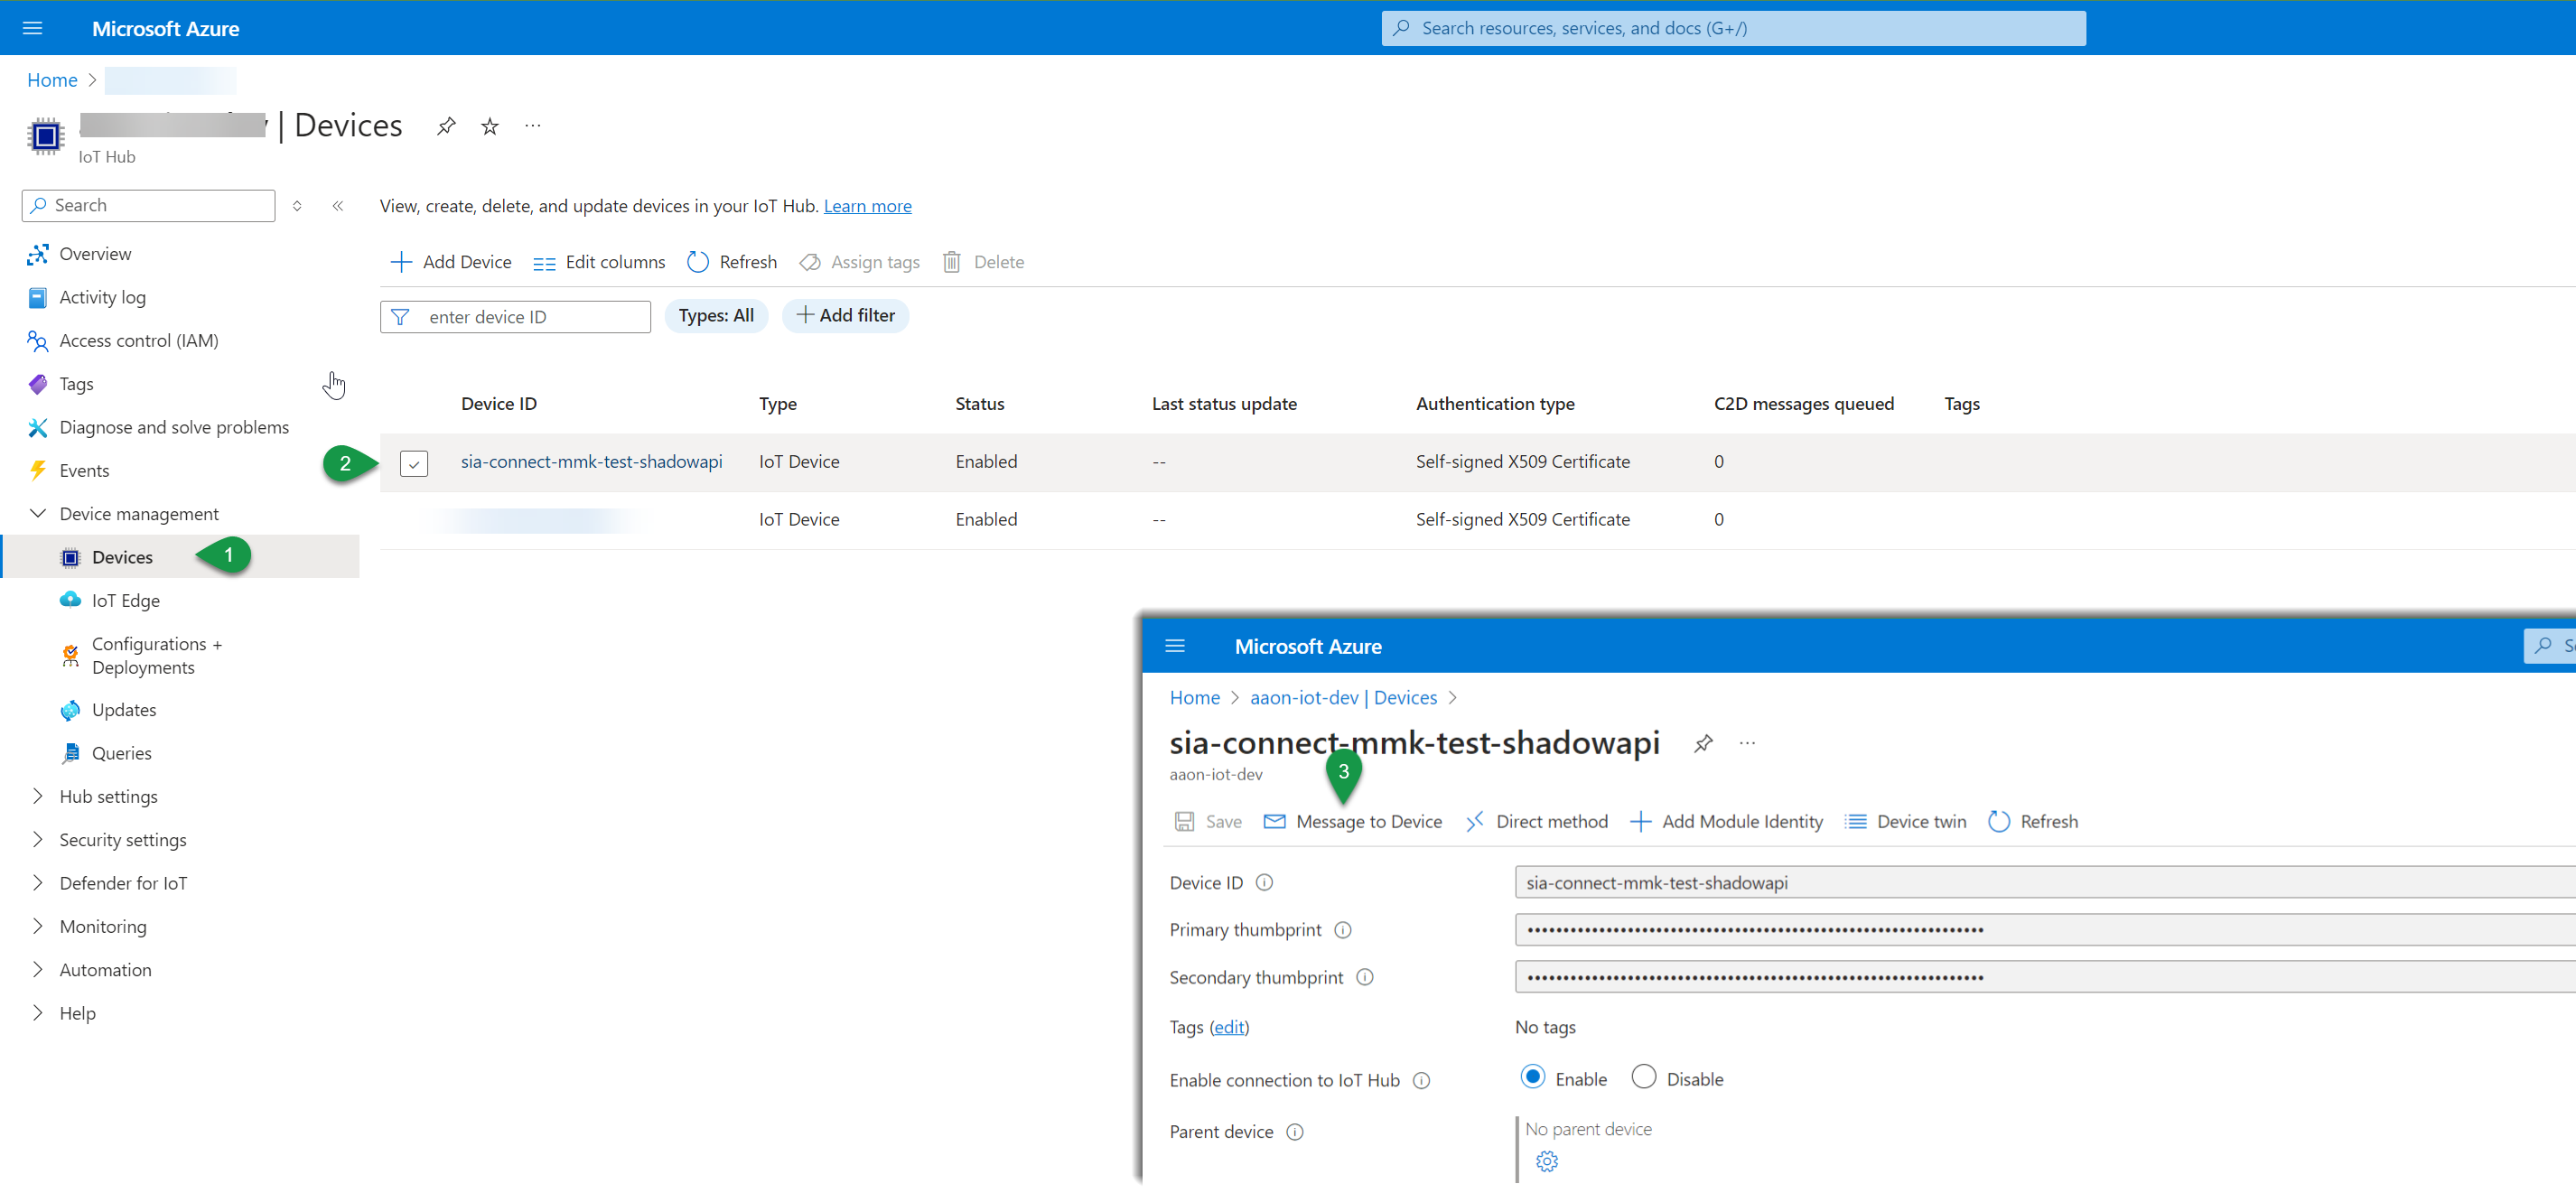
To send a cloud-to-device message to the Shadow API in the Azure Portal do to :
- IoT Hub → Devices (under Device Management) → “Your device you just enabled for Shadow API” and select the Message to Device

- Send one of the above Shadow API request examples and monitor the response. Check out Monitoring IoT Hub events, messages & metrics for how to monitor IoT Hub telemetry. In this example the Azure IoT Explorer is used.

Example: Reading the UUID as anonymous user
Send the following command as cloud-to-device message while monitoring the telemtry coming from the SIA Connect:
{
   "url": "/api/setup/uuid",
   "method": "GET"
}
UUID of SIA Connect read successfully from the Shadow API
The monitored telemetry from the SIA Connect Shadow API contains the HTTP response wrapped into the Shadow API MQTT format. The payload received is:
{
    "uid": "",
    "url": "/api/setup/uuid",
    "sia_uuid": [
      "6983b60b-2026-48e9-9b38-db87e4b81661"
    ],
    "target": [
      "/devices/sia-connect-mmk-test-shadowapi/messages/events/"
    ],
    "method": "GET",
    "payload": "{\"name\":\"uuid\",\"value\":\"6983b60b-2026-48e9-9b38-db87e4b81661\",\"description\":\"Unique ID of the box.\",\"editable\":0}",
    "headers": "{'Date': 'Wed, 08 May 2024 06:46:13 GMT', 'Server': 'Apache/2.4.18 (Ubuntu)', 'Access-Control-Allow-Origin': '*', 'Content-Encoding': 'gzip', 'Vary': 'Accept-Encoding', 'Cache-Control': 'max-age=0, no-cache, no-store, must-revalidate', 'Pragma': 'no-cache', 'Expires': 'Wed, 11 Jan 1984 05:00:00 GMT', 'Content-Length': '125', 'Keep-Alive': 'timeout=5, max=100', 'Connection': 'Keep-Alive', 'Content-Type': 'application/json;charset=utf-8'}",
    "status": "200"
  }
where we the name of the parameter is uuid and the value contains the uuid of SIA Connect 6983b60b-2026-48e9-9b38-db87e4b81661
Example: Reading and importing configuration as logged in user
Base64 encode login
The first step is to generate our Basic authentication header. You can also use the Bearer token for authentication. Use your own username and password to generate the authorization header
Username: sia
Password: connect
Base64 encoded login: base64(sia:connect) = c2lhOmNvbm5lY3Q
Final header: "Authorization": "Basic c2lhOmNvbm5lY3Q="
Send the read configuration request
To load the complete configuration send an API request to /api/init with the authorization header:
{
   "url": "/api/init",
   "method": "GET",
   "headers": {"Authorization": "Basic c2lhOmNvbm5lY3Q="}
}
Configuration read successfully
After a successful configuration read request the following HTML encoded reply should be received
{
    "uid": "",
    "url": "/api/init",
    "sia_uuid": [
      "6983b60b-2026-48e9-9b38-db87e4b81661"
    ],
    "target": [
      "/devices/sia-connect-mmk-test-shadowapi/messages/events/"
    ],
    "method": "GET",
    "payload": "{\"version\":{\"api\":\"1.2.9\",\"core\":\"1.1.3\",\"library\":\"1.8.6\",\"plugininterface_iid\":\"com.mm-technology.SIA\\/1.0.7\"}, .......",
    "headers": "{'Date': 'Wed, 08 May 2024 07:10:46 GMT', 'Server': 'Apache/2.4.57 (Debian)', 'Vary': 'Authorization,Accept-Encoding', 'Access-Control-Allow-Origin': '*', 'Content-Encoding': 'gzip', 'Cache-Control': 'max-age=0, no-cache, no-store, must-revalidate', 'Pragma': 'no-cache', 'Expires': 'Wed, 11 Jan 1984 05:00:00 GMT', 'Content-Length': '5766', 'Keep-Alive': 'timeout=5, max=100', 'Connection': 'Keep-Alive', 'Content-Type': 'application/json;charset=utf-8'}",
    "status": "200"
  }
we have shorted the response payload in the example as it is too long to show.
Send a new configuration
Now, lets load a configuration of a Simulator instance sending data to a Virtual instance. You can download the configuration and the example Shadow API here:
SIA Connect - Shadow API Configuration example (Regular configuration file)
SIA Connect - Payload example to import configuration (Payload example of configuration file in Shadow API format)
Publish the Payload example to the Shadow API (remember to change authorization header to match your credentials).
Import successfully executed
A message similar to the below should be received from SIA Connects Shadow API after a successful import
{
    "uid": "",
    "url": "/api/import",
    "sia_uuid": [
      "6983b60b-2026-48e9-9b38-db87e4b81661"
    ],
    "target": [
      "/devices/sia-connect-mmk-test-shadowapi/messages/events/"
    ],
    "method": "PUT",
    "payload": "",
    "headers": "{'Date': 'Wed, 08 May 2024 09:53:34 GMT', 'Server': 'Apache/2.4.57 (Debian)', 'Vary': 	'Authorization,Accept-Encoding', 'Access-Control-Allow-Origin': '*', 'Content-Encoding': 'gzip', 'Cache-Control': 'max-age=0, no-cache, no-store, must-revalidate', 'Pragma': 'no-cache', 'Expires': 'Wed, 11 Jan 1984 05:00:00 GMT', 'Content-Length': '20', 'Keep-Alive': 'timeout=5, max=100', 'Connection': 'Keep-Alive', 'Content-Type': 'application/json;charset=utf-8'}",
    "status": "200"
  }
Azure IoT hub maximum message size of 256Kb
The maximum message size in Azure IoT Hub is 256Kb. If the response becomes larger than this we suggest to split it up into more requests calling the individual endpoints.